Showing posts with label Warhammer Fantasy. Show all posts

Friday, April 13, 2012

Vampire Counts Battle Standard Bearer

Warhammer Fantasy Games Workshop Forge World Vampire Count Standard BSB

I had a chance to paint the Vampire Counts BSB, one of the outstanding new designs from the Warhammer Forge (part of Forge World). I am a huge fan of the Warhammer Fantasy aesthetic, and there are several elements of this sculpt that exemplify what makes Fantasy so great. 

  1. It's so blatantly morbid that it actually goes beyond the barriers of good taste into a strange dimension of parody where they are allowed to get away with far more than they would normally. 
  2. GW/FW is known for slapping armor on almost anything and no where is this more apparent than this sculpt. What could have been an anemic offering is rendered in gloriously damaged detail. This not only gives the sculpt a visual weight, but a physical one as well. The wight holding the banner is a strong piece of resin, not nearly as damage prone as it's plastic skeleton counterparts.
  3. The pose.


Warhammer Fantasy Games Workshop Forge World Vampire Count Standard BSB

The pose, while static enough to fit the demands of the ranked units, still fits a lot of personality in. This is mainly thanks to the several gentlemen, or what's left of them, occupying the cross bar of the banner. It would be one thing if they had simply been impaled and left to rot, but the fact that their cold-dead-hands has been clasped around the banner itself is a testament to mad creativity at it's finest. While painting the glowing blue eyesockets of the Bearer himself, I decided to continue on and paint he eyesockets of the top-shelf gentlemen as well. After all, how much more fun would it be if they too were animated and throwing things at the enemy as the Vampires marched inexorably forward? 

Warhammer Fantasy Games Workshop Forge World Vampire Count Standard BSB

The only misgiving about this sculpt is the tiny connection point just above where the hand is holding the banner. The resin is extremely weak at this point, and it's worth noting that while the sculpt did hold up, I would have liked to have seen Forge World work a little extra creativity into ensuring this mold was solid. 

Don't let that stop you though. This is a fantastic product, clean, artful, and simple. This is what every wargaming mini should be, and would be a fantastic addition to any Vampire Count army.

Friday, March 23, 2012

Beastmen Beastlord with Great Weapon

This model is being painted for the 2012 Clean-Slate Challenge, an attempt to paint all the forgotten models accrued over the years by an enthusiastic hobbyist. 

I've wanted to paint this model for quite some time. It was the pose that sold it for me. There's only two types of personalities that would lend themselves to doing something like this: total inexperience, or total confidence bought on by a lifetime of battle. As this guy is quite literally the boss, I say it's the latter. I went so far as to purchase this model, but just never got around to actually painting it. Time to fix that.

Micro-Lesson: Photography 
You could write a whole book on small-scale photography (in fact, several people have.) Today, we're just covering the basics that you should consider when you're getting your mini ready for it's internet debut. We spend many long hours working on our models, making sure every little detail is perfect; we owe it to ourselves to take the five minutes to make sure the photo reflects such careful attention to detail.

1. Give it a proper background
The shot below is fine for a Work-In-Progress (WIP) shot but not a finished one. All the junk laying around is distracting, not to mention unsightly. Clean things up with a simple piece of cloth. You don't need anything fancy, just a plane of neutral color to photograph your mini against. If you live near a store that sells fabric, you'll find you can buy "scraps" for cheap. You might even find some cool textures that you like the look of. This will not only clean up the photo, but reflect light evenly over the model. Speaking of light...


2. Light it
If you take nothing else away from this article, let it be this: you owe it to yourself to have good light when you work. What we're doing to our eyes working on this scale is downright criminal. The level of detail that is being cast in these models is impressive, but if you want to have half a chance of seeing and working with it, good light is essential.

That being said, brighter is not always better. 


At some point, the quality of the light becomes more important than the amount. Having multiple light sources that use the same type of bulb and manufacturer can really help when it comes to fighting eye-strain.

For my setup, I use a pair of full-spectrum lamps, one to either side of my work. I keep them at different heights so I get the most light coverage no matter how I'm holding the model. It ensures that I can work for long periods of time comfortably, and that I don't miss details on my work. Additionally, there's a bonus to having high-quality lights to paint with...

You now also have high-quality lights to photograph with.

Full-spectrum lights eliminate the blue or orange tints you see in a lot of mini photos like the one above. They let the camera do its job with the least amount of built-in compensation. The less information the camera has to make up as it goes along, the better. That being said...

3. Use a decent camera
The camera I had been photographing with up until last week was originally purchased in 2002. I was able to get away with it due to the aforementioned background and lighting. More importantly, though, was the lens of my old camera. Megapixel count will not magically create quality, the only way you're going to get a good picture is with a good lens.

In the photo below, the 2002 camera does a good job with the image, but at full resolution you can see the details start to get a little fuzzy. Still, this is by all accounts a good picture that most people would be happy to have. Let's fast forward 10 years of technology.


You can see below just how much detail the new camera is capable of capturing. For your reference, this is a Nikon Coolpix S5100; which cost me $100 new. We're all on a budget, and it's good to see you don't have to drop $20k on a pro-sumer SLR with a specialized macro-lens. An hour of research will last you through years of photographing without breaking the bank.

Warhammer Fantasy Games Workshop Miniature Beastmen Beast Lord Great Weapon

There's one thing I didn't mention here, and that's photoshop. I don't think it's fair to expect that a recreational painter should have access to high-end graphics software and know how to adjust levels, white balance, and so forth. I haven't done anything to any of these pictures in photoshop aside from cropping and resizing, which you can get from much more modest (read: free) graphics programs. If it's well lit with a clean background, you won't need anything else.

So another model is done and tucked away. Next week we take a break from the challenge for something completely different...

Friday, March 16, 2012

Necromancer

This model is being painted for the 2012 Clean-Slate Challenge, an attempt to paint all the forgotten models accrued over the years by an enthusiastic hobbyist. 

This model came to me from a good friend who had purchased a Warhammer Fantasy Battles started box back in the day when it was Empire vs. Orcs. He had purchased some supplemental figures for his empire army, just because he liked the way they looked. This model made it's way to me brand new and unprimed, and was promptly tucked at the back of the bits box. No more hiding sir Necromancer, into the light with ye!


Have a look at this guy and start to build an image in your mind of how you would paint him.


If the image is anything like mine was, it's probably pretty close to the one we've been collectively spoon-fed our entire lives. Dark clothing, withered skin, musty atmosphere. A soulless old man, completely desaturated of color and life. 

It's exactly how I was going to paint him until I remembered the entire point of this exercise, to challenge myself creatively and see where I could take the sculpt.

Make it Your Own
I read a lot of tutorials and articles on the internet dealing with creativity and visual art. Though each one might be slightly different in terms of it's presentation, they all boil down to the same two or three elements over and over. One of those elements is the concept of originality. 


Warhammer Fantasy Games Workshop Miniature Undead Necromancer

As hobbyists, we're always striving to be original in everything we do, to help ourselves stand out from the crowd and command the respect of our peers. Sometimes an artist simply tries to be original by doing it the best, other times they seek the road less travelled. 

In this case the road less travelled was throwing a hard 180 in terms of color selection and dynamic lighting. Rather than draw from the hundreds of repetitious horror images I grew up with, I opted to go for the American southland, deep in the heart of Cajun territory, Mardi-Gras style. 

A Shadowman. 

And why not the Shadowman? Just because Walt Disney put out a movie with similar color styles doesn't mean it's off the tables. The Princess Frog was a well received movie, but I'm going to go out on a limb and say most Warhammer players who weren't parents and didn't have an active interest in animation never saw it. 

Remember, it doesn't have to be new; nothing is. It only has to be new to the person who is seeing it.


This is why retro works. Any given image will only survive for so long in the collective consciousness of society before it fades into obscurity. If you want to be original, you don't have to sit and stare at a blank wall until your inspiration magically comes to you (trust me, I've tried.) All you need to do is a basic analysis of what people are seeing on a regular basis. Whatever it is only represents a small portion of what is out there, and all you need to do as a creative person is to tap into those dusty tomes of lore to draw your inspiration. 


Micro-Lesson: Saturated Light
I covered source lighting in a previous post, but I wanted to go over some of the rules that change when you go from realism to saturation. 
  1. Work Backwards
    When you paint light sources over a dark model, you're looking to hit the highlights very gently and just on the edges of the surface. You're usually working by painting the model dimly first and then highlighting it. When going to areas of concentrated color, the key is to start with the lights instead of the backdrop. The first pass of colors had this model oozing green, yellow, and red. The blue was added afterwards to create the gradients as the source faded.
  2. Let Multiple Lights Mix
    Even though these are three strong light sources, they are going to have some areas of overlap where one does not dominate. This step is best done after the initial shading work. For example, I was able to blend a little extra green into the contact area with yellow, as I was cleaning up the blue. You don't have to go overboard with this, as you're looking to really push those colors, but a little mixing and overlapping goes a long way. 
  3. Have Fun With It
    Sometimes there's just nothing else to do but throw up your hands and yell like you're on a roller coaster. I don't condone this during the actual act of painting, in public or at home. That being said, sometimes we hobbyists get a little too concerned with finding the perfect color, the perfect freehand and so on. Never forget they're toy soldiers, and you'll feel free to let your imagination run wild.


Just writing this post has given me a couple new ideas on where to take painting, and I'm excited to try them out on some upcoming models. Here's to creativity and originality!

Friday, March 9, 2012

Bretonnia Model Range Reboot


I was getting ready to build a new army in late 2010 after finishing the Warriors of Chaos. Knowing how much is required to build an entire army, I examined the possibilities exhaustively. I poured over multiple editions of several army books, looked at source material, considering every angle as I weighed my options. I'm embarrassed to admit there were spreadsheets involved. Plural.

In the end I had narrowed down the list from every fantasy and 40k army to only three. I chose the Space Marines, but the remaining two remained strong contenders until the very end. Bretonnia was one of those silver medalists, and could easily have become the army I did in 2011. However, I knew that there was a fatal flaw in the range that would fight me tooth and nail as I constructed the force. The other two armies didn't have this problem, and so the Knights of the Grail fell by the wayside.

The problem that held back my decision?

The models.

While the Bretonnian army range isn't quite the mess that the Dark Eldar were, they're still in pretty bad shape. Most models are outdated, many barely supported, and there's still way too much metal. They do have the benefit of an all-plastic core; ironically enough the peasants have the best looking models relative to the rest of the range. But Bretonnia isn't about low-born, it's about knights in shining armor. If GW is going to bring this army up to par for an update in 2012 and beyond, they basically need to reboot the heart and soul of this army. And let's not forget the most important argument for new Bretonnians; the massive sales that would come from every single space marine player who wants a piece of the action. Good knights make for good marines, and nothing lines the pockets of corporate like new marine kitbashing options!

Here's what I see on the road to a successful return for the champions of the grail.

Boxes to Keep

  • Men-At-Arms
  • Peasant Bowmen
  • Pegasus Knight

While all of these boxes could use a little freshening up, there are other selections that really need the attention more. GW could easily keep these boxes exactly as they are without the army suffering.

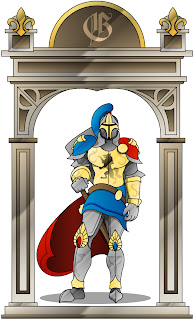
Repackage the Knights
The curent knights errant/knights of the realm box is a fine example of GW's ability to release a box that fits more than one function. We've seen this more recently in several other boxes, including the beautiful hexwraith/black knight combo box. I see this function playing a key role in the reboot.

Warhammer Fantasy Games Workshop Miniature Bretonnia Knight Errant
Knight Errant
Knights Errant / Questing Knights
This box would contain a more back-basics approach to knighthood. Less ornamentation and lots of weapon options are the keys here. Questing and Errant Knights have a lot in common, it's their motivations that set them apart. Where the Errant Knight is inexperienced, the Questing Knight has given up the trappings of nobility to attain a higher goal.


Errants are crazed and headstrong, something which could be conveyed by gaudy imagery, wild faces, and primitive decoration. Questing knights by contrast have anointed armor, great weapons, ornaments to mark them being on a holy mission. It's just like the difference between Blood Claws and Grey Hunters from the Space Wolves; one is all attitude, the other stoic determination.


Warhammer Fantasy Games Workshop Miniature Bretonnia Knight Realm
Knight of the Realm


Knights of the Realm / Grail Knights
Speaking of the Space Wolves, GW needs to take a page from their own playbook with this new kit. The Wolf Pack box was overflowing with options, and if GW is going to issue a box that is literally required in every Bretonnian army, it needs that level of variety.

As for the Grail Knights, the designers have quite the task on their hands. I believe this is where a multi-purpose box of this nature would really shine. Giving the hobbyist the ability to dress the knight to the appropriate level would not only result in a metric ton of customized knights, but the usefulness would stretch deep into the range as a whole. Perhaps a Knight Errant unit champion needs an ornamented shield, or a Pegasus knight could use a more intricate lance; this is where you would find those solutions.

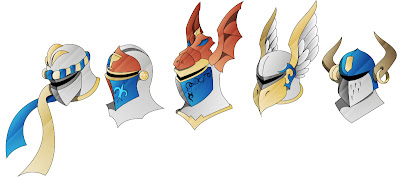
And as long as we're completely revamping the knights, I would personally like it if GW moved away from the hood-ornament helmet approach. All of these knights have helmets that intrinsically linked to a spirit-animal, go full tilt and make some amazing designs that really speak to the source of the inspiration, rather than a bolted-on afterthought.

Warhammer Fantasy Games Workshop Miniature Bretonnia Knight Helm Designs
No more hood-ornament helms GW; you're better than that.

Field artillery box
This is an opportunity not only for Bretonnia, but Warhammer Fantasy in general. There's always talk of castles and siege warfare, but up to now there has been little-to-no model support for said weaponry. GW could do something really cool by bringing transforming the Trebuchet into an expandable plastic kit. By offering a modular timber-based frame and a number of interchangeable options,  they could not cover not only the trebuchet, but ballista, catapult, and battering ram with one box. A box like that would have massive appeal to the Warhammer audience, not just Bretonnian players.
Warhammer Fantasy Games Workshop Miniature Bretonnia Questing Knight
Questing Knight

Mounted Yeomen
Bretonnia is the undisputed master of cavalry, no doubt about it. But when is it too much? If you count Pegasus Knights, there are already five mounted units of Bretonnians; do we really need six? It would be nice to see these guys bought up to speed in a box similar to the Chaos Mounted Marauders, but only that. The focus of Warhammer has always been that having a horse/cold one/whatever is a mark of status, not necessarily so with these guys. They definitely have their place, but if GW only has so much resources to commit to a reboot, I wouldn't want these guys taking away from the real focus of the army.

Grail Reliquae Bearers
I see these guys very much like the empire flagellants, only a bid more morbid. At the very least it would be nice to see this bought into finecast, but really, there are more important models to consider...


Warhammer Fantasy Games Workshop Miniature Bretonnia Grail Knight
Grail Knight
Bretonnian Hero/Lord
With the King, Green Knight, and the Fey Enchantress all in finecast, GW is at a bit of a crossroads with the people in charge of the proceedings. Looking at what has been done with the empire hqs, it would be great to see a combined plastic box for Damsels on foot and horseback.

More importantly, in an army as rich in heraldry as Bretonnia, an instant best seller would be a plastic lord box like we've seen from the Empire, High Elves, and Orcs. Then we could finally get our hands on a proper plastic Bretonnian BSB.

Conclusion
Options, options, options. When you're mustering a war-host of this caliber, you want them to look their best. Armies are a huge commitment of time and money; it's GW's job to make sure it's worth it for us to invest. With intelligent box redesign, modular kits, and plenty of plastic, Games Workshop can make 2012/2013 a year to remember for the champions of the Grail. 

Friday, March 2, 2012

Pegasus Knight

This model is being painted for the 2012 Clean-Slate Challenge, an attempt to paint all the forgotten models accrued over the years by an enthusiastic hobbyist. 

I've always had a fascination with knights. If you look at the six armies I've painted, only one of them hasn't been knights or space knights. I never had the conviction to paint en entire Bretonnian army (more on that next week), but that didn't stop my picking up a model from time to time. This Pegasus Knight stood patiently by for many months as I worked on other projects, and now it was time he receive his dues.


Warhammer Fantasy Games Workshop Miniature Bretonnia Pegasus Knight

The first order of business was to ensure that the knight was properly pimped out. I did some research into what other people have done with this model in the past, and one of the recurring themes was a more impressive lance. This only makes sense, a Bretonnian Pegasus Knight is pretty much the pinnacle of ostentatiousness. The only thing more showy that a armor clad knight on a flying horse is one with a bigger flag!


I scrounged through my fantasy bits and came up with just the pieces I needed: a unit banner from an old Empire state trooper and the lance from a High Elf prince. The flag was second-hand and in pretty rough shape. Thankfully it had been soaking in simple green for the better part of two years. The layers and layers of paint had finally come free, leaving me to concentrate on the liberal glue that had been used to secure it to the pole.

Something good to note here: it pays to have bits for the game system you're working on. Not only do the pieces fit stylistically with each other, but it eliminates a lot of problems in terms of fitting. Despite the fact that I was pulling from 3 separate army ranges, the fact that they were all GW meant that all the pole diameters and join locations were already consistent.


After everything was cleaned up, I drilled all three pieces for pins. This was a time consuming and delicate process, but there was no way I would realistically rely on super glue of any caliber to hold a join that fragile. Once everything was pinned, glued, and primed, it looked like it had been cast that way.


Micro-Lesson: Freehanding
Freehanding is an all or nothing gamble that will either make your model look like gold or garbage. My suggestion is to start simple with some script that no one expects to be able to read. It will give you a good foundation and let you experiment. A great trick is to prime some left-over frames from your plastic sprues and use the long flat surfaces to get some experience. But when it comes down to the real deal, I'd like to propose a new way of thinking about how you paint those impossibly small details.

Picture your mind as the world's most impressive juggler. Every single thing you do all day every day is like a bowling pin being thrown to this guy/gal. The more you're doing at once, the more pins your brain has to juggle. Everything from breathing to walking to thinking about stuff to talking to chewing gum; it's all stuff your brain has to handle.

It gets worse.

Not only does any activity add pins, you end up having to add extra pins for a skill. Watch a competition of any sort, the competitors are most likely in a quiet, secluded space with little or no intereference from the outside world. Watch the face of a gymnast during the olympics; that is the face of someone who has committed every single pin they can to whatever act they are performing. So what does this have to do with freehanding toy soldiers?

Everything.

First off, you need a plan. Sketch your image out a couple times to make sure you're happy with it and get some practice in. Make sure your space is at whatever volume level you can best ignore (SimplyNoise with a pair of headphones is perfect for this). Do everything you can to make sure that you won't be interrupted, during whatever time of day you usually do your best thinking or when your the most relaxed.

Now lets talk physical. Just like sudden noises and sights will distract you, so too will having to control your body. Even the act of sitting requires core activation and some amount of motor control. With this in mind, I've begun laying down on the floor, completely removing my core and legs from the equation. I only had to move my lower arms while my mind stayed focus, allowing me to execute complex freehand designs with relative ease.


This has been one of my favorite models to paint in the challenge so far. I was so happy with this model that I couldn't possibly let it go to waste just sitting on my shelf. Thankfully, I knew someone who could make good use of it...

Friday, February 3, 2012

Priest of Ulrik


This model is being painted for the 2012 Clean-Slate Challenge, an attempt to paint all the forgotten models accrued over the years by an enthusiastic hobbyist. 

This Priest of Ulrik was acquired from a friend's bitzbox. I believe he originally got the model thrown randomly into an ebay auction lot. It passed to me, mercifully in one piece, and spent a year in my bitzbox. Time to finally give this poor guy some recognition for so many years spent in neglect! 


The first challenge in painting this model was simply identifying it. It's been a long time since GW has formally acknowledged the followers of Ulrik; something that will hopefully change with the rumored Empire updates.

Warhammer Fantasy Games Workshop Miniature Empire Priest of Ulrik

Once I found out what this guy was, I was able to find some good examples of similar models in old empire army books and the outstanding GW publication: Uniforms and Heraldry of the Empire. This book is a must for any hobbyist, irrespective of whether or not they play the empire. The same goes for the Skaven equivalent book. 


Micro-Lesson: White Fur
GW fur is a pain. Trying to paint that fur white is an even bigger pain. 

I started with a coat of Astronomican Grey, washed down with a 1:1 mix of Asurman Blue and Badab Black. The issue with this is that the fur is modeled too deep, which means there's too much wash and the finish is too dark. It took two drybrush passes with Astronomican and a half dozen drybrush passes with Skull White to get the fur where I needed it. 

The fact is that when you're painting fur, it should look a little flat, because fur is flat in many instances. It sits tightly packed against the skin, forming a protective barrier against the cold. The texturing is nice, but it's a little too much for real fur. I'd be interested to see what GW fur would look like after a light wash of the new liquid green stuff to even things out a little. 


Another model for the 2012 CS Challenge is finished. Next up, a little action with the Imperial Guard.

Monday, November 7, 2011

Warhammer Fantasy: Dwarf Warrior

Inspired by Brian Niro's "For the Love" series, I decided to dig up some of the Warhammer Fantasy mini's that I've painted just because I really wanted to.

Warhammer Fantasy Games Workshop Miniature Dwarf Warrior

I love the look of GW dwarves, and I love how much weight they've managed to put into even the most basic warrior. I don't have the time or money to build an entire Warhammer army at the moment, but if I did, the Dwarves would be in my top tier choices.


Thursday, October 13, 2011

Kroxigor

I rescued this guy from a random bits box when I realized there was an entire Kroxigor just sitting there. It was fun to work with an older model and to breathe new life into an otherwise forgotten sculpt. The new Kroxigor's are beautiful, but this guy still holds up. I glued some temple guard bits onto his belt to add some bulk/interest.

Warhammer Fantasy Games Workshop Miniature Lizardman Kroxigor


Monday, August 29, 2011

WFB: Vampire Counts Grave Guard

warhammer fantasy vampire count grave guard


The first thing that really struck me about this box was just how microscopic the parts were. Granted, I'm used to painting space marines, warriors of chaos, terminators, dreadnoughts, and the like, but I am a miniature wargaming painter and I shuddered to think how on earth I would even find these bits if they were to spill. Beyond the problems of simply keeping track of the bits, the other major problem this poses is with assembly. Without any real points for super glue to bond, the model itself becomes very fragile. Even with the special impact resistant super glue I use, I was very careful any time I had to handle the minis.

warhammer fantasy vampire count grave guard


As I have found, using the magic wash mixes is absolutely key to successfully painting these miniatures. The areas sculpted into the definition of the bones are beyond minute. Painting an area like that by hand would be excessively time consuming. Of course, if you're just painting a single mini for show, by all means go for it, but for the hobbyist with an army to work through, there's no telling how long it would take to finish a unit of these guys, especially in 8th edition where big blocks of infantry are the order of the day.

warhammer fantasy vampire count grave guard


I chose the sword/shield combo because I found the great weapons to be uninspiring. For such a characterful unit, the great weapon designs are quite bland by comparison. I would highly recommend the great weapons for conversions as the blades are actually very well designed. Still, if you're intending to run a big block of great weapon grave guard, you could do far worse than what's offered here.

By contrast, the shield designs are fantastic, and the sword blades would fit a myriad of conversion opportunities. Anyone playing Chaos Space Marines would do well to consider this box. The skeletons would make for nice remains of victims, and the weapons would all convert nicely into a very 40k-friendly baroque close combat arsenal.

warhammer fantasy vampire count grave guard


All-in-all a very inspired box for the fantasy lineup, easily one of the best skeleton boxes out there. For Vampire Count players, this is essentially a required purchase (several times over), but don't overlook it if you're not running the necromancers from the north. There's a lot to be found here, and a single box would go a long way to adding flavor to many armies from both fantasy and 40k.

Warhammer Tutorial: 5 Step Snow and Stone Bases

Yes, it's tutorial time again!

This time we have a play by play of how to paint stone tiles onto an otherwise "blank" base, and as a bonus, get it loaded up with snow.

So why take all the extra time to paint a boatload of blank bases? Several reasons.

First and foremost, the obvious fact is that the models we're painting were meant to sit on a flat surface. Custom 3D bases are all well and good and worth the time for the special Skaven Warlord who heads up your army, but you don't want to have to custom pose all your slaves and clan rats over and over and over again. Custom painted flat bases are done when they're done, no more effort required.

Second, you have complete control over how the base looks. While the bases you order online are gorgeous, seeing them repeated 20 times inside a single army diminishes the overall effect. Even when I was batch processing bases for blocks of 20 guys, each base looked slightly different; different enough to keep the look of coherency without redundancy.

Third, and perhaps most importantly, it's cheap. If you don't want to spend an extra $100 custom basing an entire army, this is a relatively fast and painless option. It may take time to paint the textures, but remember, you'd have to paint the 3d pieces anyways. And in almost all cases, 3D take more time than 2D.

Step 1: Blank Out

Warhammer: Snow Stone Base


To establish a good foundation for your stone, clean and prime the bases you want to work on. Take the extra time to make sure the bases are squeaky clean when it comes to flashing and sprue nubs. If you're going to expend so much energy to make it look good, you might as well start with a clean slate.

Also, since this is stone, don't worry about getting the coat to be 100% perfect. A little primer showing under the paint will help add extra detail by giving the illusion of texture. For this demonstration, I'm using Adeptus Battlegrey for the dark grey and Astronomicon Grey for the lite grey. If you're feeling like taking extra steps, feel free to mix in extra coats with other similar hues like Dheneb Stone and Charadon Granite.

A quick note: Attention Warhammer Fantasy players; Adeptus Battlegrey is your friend! At full strength, it's the exact same hue as sprue grey, which means you don't have to do anything to your movement trays but assemble them!

Step 2: Broad Strokes

Warhammer: Snow Stone Base


Next you want to get a feel for what's to come. With a relatively large brush of watered down Astronomicon, I paint out the general shape of what I want the stone to do. This soft grey will serve as the blueprint for what's to come. This is the stage you want to make mistakes with. If you don't like something, the paint should be wet enough to just wipe off and start again, and any residue left behind will simply create another layer for your finished stone.

If you want to get all fancy and add in geometric designs, be sure to keep around items of the size and shape you want to see. For example, the circles on the large square base are just other circle bases laid down and painted around. The rest is freehand, but you can see how having various bits and bobs around could lead to a nearly infinite number of designs just by mixing and matching concentric shapes.

Step 3: Refinement

Warhammer: Snow Stone Base


With a much smaller and less watered down brush of Astronomicon, trace out the exact shape of what you want your tile to look like. Be sure to paint inside the existing lines, but try to stick to one side or the other. This is where you'll begin to define the light source.

For example, I've got a stack of three vertical lines from the previous step, and I trace over line one on it's left side. From the point on, I'm going to stick to the left side of any vertical lines I've created, and I would do the same for horizontal lines. The consistency is going to make the process easier and add a visual lever of believability to your project.

Step 4: The Devil and his Details

Warhammer: Snow Stone Base


Now for the tricky part. This part is optional, but really adds a lot to the project if you have a steady enough painting hand. I say painting hand because I do not have steady hands at all, but can maintain a good level of control over them when I'm laying down paint. You're going to need a very fine brush, the finest they have at your local craft store. With as much care as you can muster, re-trace the strong grey line from step 3 with dark grey or black. If your hand drifts or you go off the line, you can cover it up by adding some extra squiggles to make it look like a crack in the stone. Finally, to add one final level of depth, grab your wash of choice (Devlan Mud in this case) and hit the other side of the black line to crate a shadow. Those of you not basing your army from the frozen north can stop here. For the rest of us, let us proceed to...

Step 5: Chilly Bits

Warhammer: Snow Stone Base


This is a two step process.

Step A
This is where we form the "bulk" of the snow drift. What you want to do is find a snow flock that uses rough ballast, which is to say, bigger and bulkier individual pieces. Woodland Scenics makes a great snow flock that I have been using for several years. You pony up $10 and you'll never need to do so again. There's so much of this stuff that I've split it evenly four ways and I still have more than I'll ever need, and I've based several armies with my existing supply.

As for the actual process, what you want to do is to mix the rough snow with simple PVC 'white' glue, until you have a paste. Put some of the 'snow paste' on your base and cover that bad boy in a light coat of white glue again. This is also a good point to put any glue down for small drifts as well. I like to trace some thin lines in between the stone tiles where the snow would have settled.

Step B
Once everything is down on the base and sufficiently coated in glue, just dip the whole lot in a lighter, fluffier snow. I've been using Games Workshop Snow. This works very well for that sparkling, freshly fallen look. If you want sludge, try giving the snow paste a wash of Devlan Mud or Gryphonne Sepia around the point where it meets the base (only after the glue is completely dry.)

Conclusion

So there you have it. Stone. Snow. The Works. This process may seem intimidating, but I highly recommend it. After your first dozen, you'll be able to batch process these bad boys in stacks of 20, and the skies' the limit from there. Don't be afraid to experiment either. You can always cover up and ugly paint job on a flat surface with ease. Just remember patience and you'll do just fine.

WFB Tutorial: Valkia the Bloody

Valkia the Bloody


This was a small project that ended up being what should have been an army centerpiece.

When GW released the new army book for WoC they provided models for the most, but not all, of the units in the book. The severity of the omission was in direct correlation to it's in-game effectiveness. No one cared that the forsaken were left out but many questioned the lack of warshrines.

There are two major camps of thought: one saying model omission is a problem and another saying it is an opportunity. I fit in the latter category.

I checked around the net to see what other players were doing, and most of them were basing the model on Saint Celestine from 40k. They were good conversions, but she just didn't have the feel I was looking for.

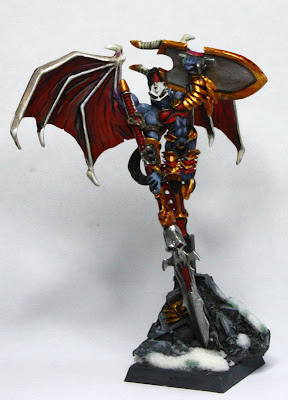
The classic range Lelith Hesperax from Warhammer 40,000 had a dynamic pose and well sculpted features. The trident she held was swapped for a lance head from the knights of chaos. A shield with the demon head on it fit the fluff from Valkia's entry. I realized the new spear blade was entirely too long to have her standing on solid ground, but as a flying model that wasn't an issue.

The wings came from a 40k chaos possessed backpack. Once trimmed from the pack though, it was plain to see the supporting arms were entirely too muscular for Valkia's slender frame. I slowly and carefully whittled the arms down to a more appropriate proportion. I had a pleasent surprise when I went to fit the wings into her back, as there was already a gap on the armor for a piece from Lelith's sprue. At times it was as though this model had always been intended to be converted.

For the skin, I chose to use a dark shade of slate grey, as Valkia has already been slain and pulled back from oblivion. To contrast the earthy tone of her skin, I went for the classic colors of khorne, a bright blood red and a glittering gold. The bleached bone stood out nicely against the red, and the overall look was tied together by the blacks and silvers.

Warriors of Chaos: 4 of 5


Warhammer Fantasy: Warriors of Chaos Army Blog
Part 1 | Part 2 | Part 3 | Part 4 | Part 5


In this article:
With the elites of the army all in place, it was time to tackle the high command.

Archaon: Lord of the End Times

Warhammer Fantasy: Warriors of Chaos Archeon Lord of End Times

With a supremely damaging statline and wargear to match, I knew I wanted to be able to break out Archaon for special occasions. However, at over 600 points, I knew the model would function as a regular chaos lord most of the time. To achieve this versatility, I swapped the iconic helmet for a chosen warrior and changed the armor color.

I was surprised by just how bad the sculpt was, especially when it came to attempting a proper fit. It took a generous amount of green stuff and re-sculpting in order to make the horse look whole. More green stuff was used on Archaon's torso to ensure the assembly held, especially the shield and strap holding arm. It gives me a healthy appreciation for today's model kits.

Harry the Hammer

Warhammer Fantasy: Warriors of Chaos Limited Edition Harry the Hammer


Limited edition models add credibility to any collection and the Warriors of Chaos enjoy the two sided blade of having them in spades. It's great to have access to so many different sculpts, but from a collectors standpoint it can be costly to track them all down. Ebay gave me access to the models I was looking for at an affordable price. For every 10 sellers who wanted $125 for this model, there was 1 who offered it for less than $30. My advice to the would-be collector is if you have a model you have your heart set on, decide how much the model is worth to you before you go over to eBay. Have patience, and you will find what your heart desires for a price that will not break the bank.

The base comes in 3 different pieces that need to be glued and filled in order to support anything. Even though I prefer to paint all the pieces of a model separately before gluing it together, there just wasn't any way I was going to be able to fit it all together without ruining the paint job. I tried to fit as many different army heralds on the remains as possible.

This was also the first model where I learned the magic of highlighting black with blue. I had always used grey or nothing at all to highlight black, but blue gave it a very cold feel that complimented the model.

Lord of Chaos on Juggernaut

Warhammer Fantasy: Chaos Lord with Mark of Khorne mounted on Juggernaut


This was one of those "just because" models that were purchased without regard to it's actual in-game effectiveness; too cool to pass up.

In construction, this model was a marvel of design. The kit cleaned up quickly; the fits simple and intuitive. The shoulder joint where the left foreleg joins the body is a perfect example. They could have just left a small peg to plug into the body, but they made the join run the entire length of the shoulder, giving it a massive amount of surface area for the glue to hold. The detail on the model was immaculate as well. For goodness sake, the thing had the symbol of khorne on it's hoof.

The only complaint I have is with the extra skulls the come with the kit. On a model that is otherwise made to assemble without pinning, these bits have nowhere to sit that isn't prone to damage.

Valkia the Bloody

Warhammer Fantasy: Warriors of Chaos Valkia the Bloody, Maiden of Khorne


When GW released the new army book for WoC they provided models for the most, but not all, of the units in the book. The severity of the omission was in direct correlation to it's in-game effectiveness. No one cared that the forsaken were left out but many questioned the lack of warshrines.

There are two major camps of thought: one saying model omission is a problem and another saying it is an opportunity. I fit in the latter category.

I checked around the net to see what other players were doing, and most of them were basing the model on Saint Celestine from 40k. They were good conversions, but she just didn't have the feel I was looking for.

The classic range Lelith Hesperax from Warhammer 40,000 had a dynamic pose and well sculpted features. The trident she held was swapped for a lance head from the knights of chaos. A shield with the demon head on it fit the fluff from Valkia's entry. I realized the new spear blade was entirely too long to have her standing on solid ground, but as a flying model that wasn't an issue.

The wings came from a 40k chaos possessed backpack. Once trimmed from the pack though, it was plain to see the supporting arms were entirely too muscular for Valkia's slender frame. I slowly and carefully whittled the arms down to a more appropriate proportion. I had a pleasent surprise when I went to fit the wings into her back, as there was already a gap on the armor for a piece from Lelith's sprue. At times it was as though this model had always been intended to be converted.

So with the big'guns all in a row, there were only a few more guys left to go before the army was declared done.

Next Article: Part 4

Warriors of Chaos: 5 of 5


Warhammer Fantasy: Warriors of Chaos Army Blog
Part 1 | Part 2 | Part 3 | Part 4 | Part 5


In this article:
With nearly a full army worth of bad guys, it came down to those who would lead from the front; the heroes of chaos.

Wulfrik, BSB, and Call to Glory

Warhammer Fantasy: Warriors of Chaos, Wulfrik the Wanderer, Battle Standard Bearer, and Hero


Wulfrik the Wanderer
Wulfrik is a wild sculpt that adds interest to any army. The sculpt is covered in grisly trophies which somehow compliments the laid back pose. My only objection to the sculpt is the head; it's too messy. I realize this comes down to taste, but my preconceptions of a champion of the gods is a shaven and scarred head, much like a space marine. Games Workshop has been doing players a wonderful service in their newer metal models by making the head a separate piece, providing a painless conversion.

Battle Standard Bearer
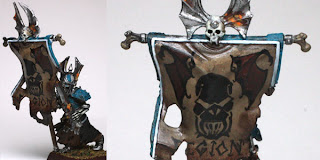
I knew the banner needed something extra to really make the eight sided star shine. I spent an hour with a sketch pad working out different concepts and ideas. The inverse star inside the normal star was a perfect symbol; weird, complex, chaotic, yet ordered. Once finished, I realized the bright green armor was overshadowing the dark banner. I repainted the entire design as a vibrant transition from red to orange to yellow. It was a pain having to restart a complex freehand from scratch, but the resulting figure was worth it.
Call to Glory
Reading through the spells of Tzeentch gave me the inspiration for this chaos hero. Call to Glory is spell that turns any infantry model into a Chaos Hero. I was enamored of the idea of having someone to represent this amazing transformation. I used the Archaeon model on foot (Limited Games Day Model) to represent the newly minted warrior. An old marauder helmet was glued down to the base as a reminder of his humble roots.

Heroes of the Gods

Warhammer Fantasy: Warriors of Chaos Hero Lord Khorne Tzeentch Nurgle Slaanesh


It made sense to have at least one hero marked for each of the gods; to have friends for the Hero of Khorne who started it all.

The sculpts for the champions of Tzeentch are, for lack of a better word, weird. Although I love the old school style, they clash with the rest of the army. I used a plastic chaos space marine terminator sorcerer lord (say THAT nine times fast). Although you can't see it in this picture, the cape was covered in insane writings on the outside, and pi on the inside... out to 99 digits, with all the 9's written in red instead of black.

The Slaanesh Hero was based on the Gamesday 2009 limited edition model, courtesy of a good friend who is an eBay master I experimented with a method of highlighting black with purple that ended up setting the paint scheme for the Knights of Slaanesh.

The Nurgle paint scheme really says a lot about the artist. It's easy to do a horrible job and claim it was intentional, but it is hard to do justice to decay. Painting clean metal is 3 layers, painting corroded metal can be 10+ layers. Blending the soft and subtle greys and greens leaves little room for error, and there is a constant threat of overworking the piece. If you want to tell how good a painter is, just ask him to paint a plague marine. It will tell you worlds about his skill.

Dark Magicks

Warhammer Fantasy: 40k Chaos Sorcerer Sorceror Ahriman Thousand Sons Tzeentch


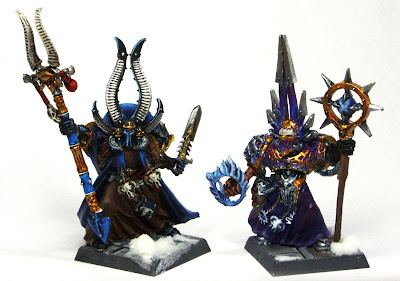
I don't like the way most of the fantasy chaos sorcerers look. These physically twisted and decrepit figures do not accurately depict a heavy armor wearing giant man from the north. To add the requisite magic users to the force, I pulled from the chaos sorcerers of Warhammer 40,000. They're physically imposing as well as arcane, wielding impressive weapons and armor. The only modification necessary was subtraction, not addition; the models I selected had power packs, guns, and pipes running everywhere.

Green stuff was an invaluable tool at this stage.

Ahriman (left) had a huge block of metal jutting out of his back where the backpack was supposed to connect, but filing and greenstuff fur made it vanish. I was even able to continue the fur onto the front to cover up another conspicuous pair of pipes. The rest of the sculpt was beautifully ornate and only required a swap from his pistol to a blade that could function as any number of gear choices from the army book.

The other sorcerer (right) only needed to be cleaned up with clippers and file. I didn't want to get to the point where I was seriously modifying (read: butchering) the sculpt, but I did need to change the look and feel of a model that was no longer in the 41st millennium. The hand that was originally holding the pistol was replaced by a plastic bloodletter hand left over from my Khorne Warriors. The fire came from a leftover staff head from the plastic empire wizards box, a great purchase for the bits box.

The armor was a happy accident where, after switching colors midway, I saw how nicely it was blending and decided just to keep it.

After all was said and done, I had a massive army of chaos warriors ready to hit the table. So what did I do with them? I sold them of course! Why should I waste my time playing the game when I could be working on another army? :)

Next Article: The Current Project